
Google Sites allows you to build and update your own website that you can share out! You can make project portfolios, public facing sites, whatever you'd like -- all without needing to know the nitty gritty of coding!
The only tool that you'll need is your browser, so let's get started!
How to use Google Sites
- Create a site
- Naming a site
- Adding content to your site
- Editing a site
- Publishing your site
- Delete a site
- Restore a site
- Further Support
Create a site
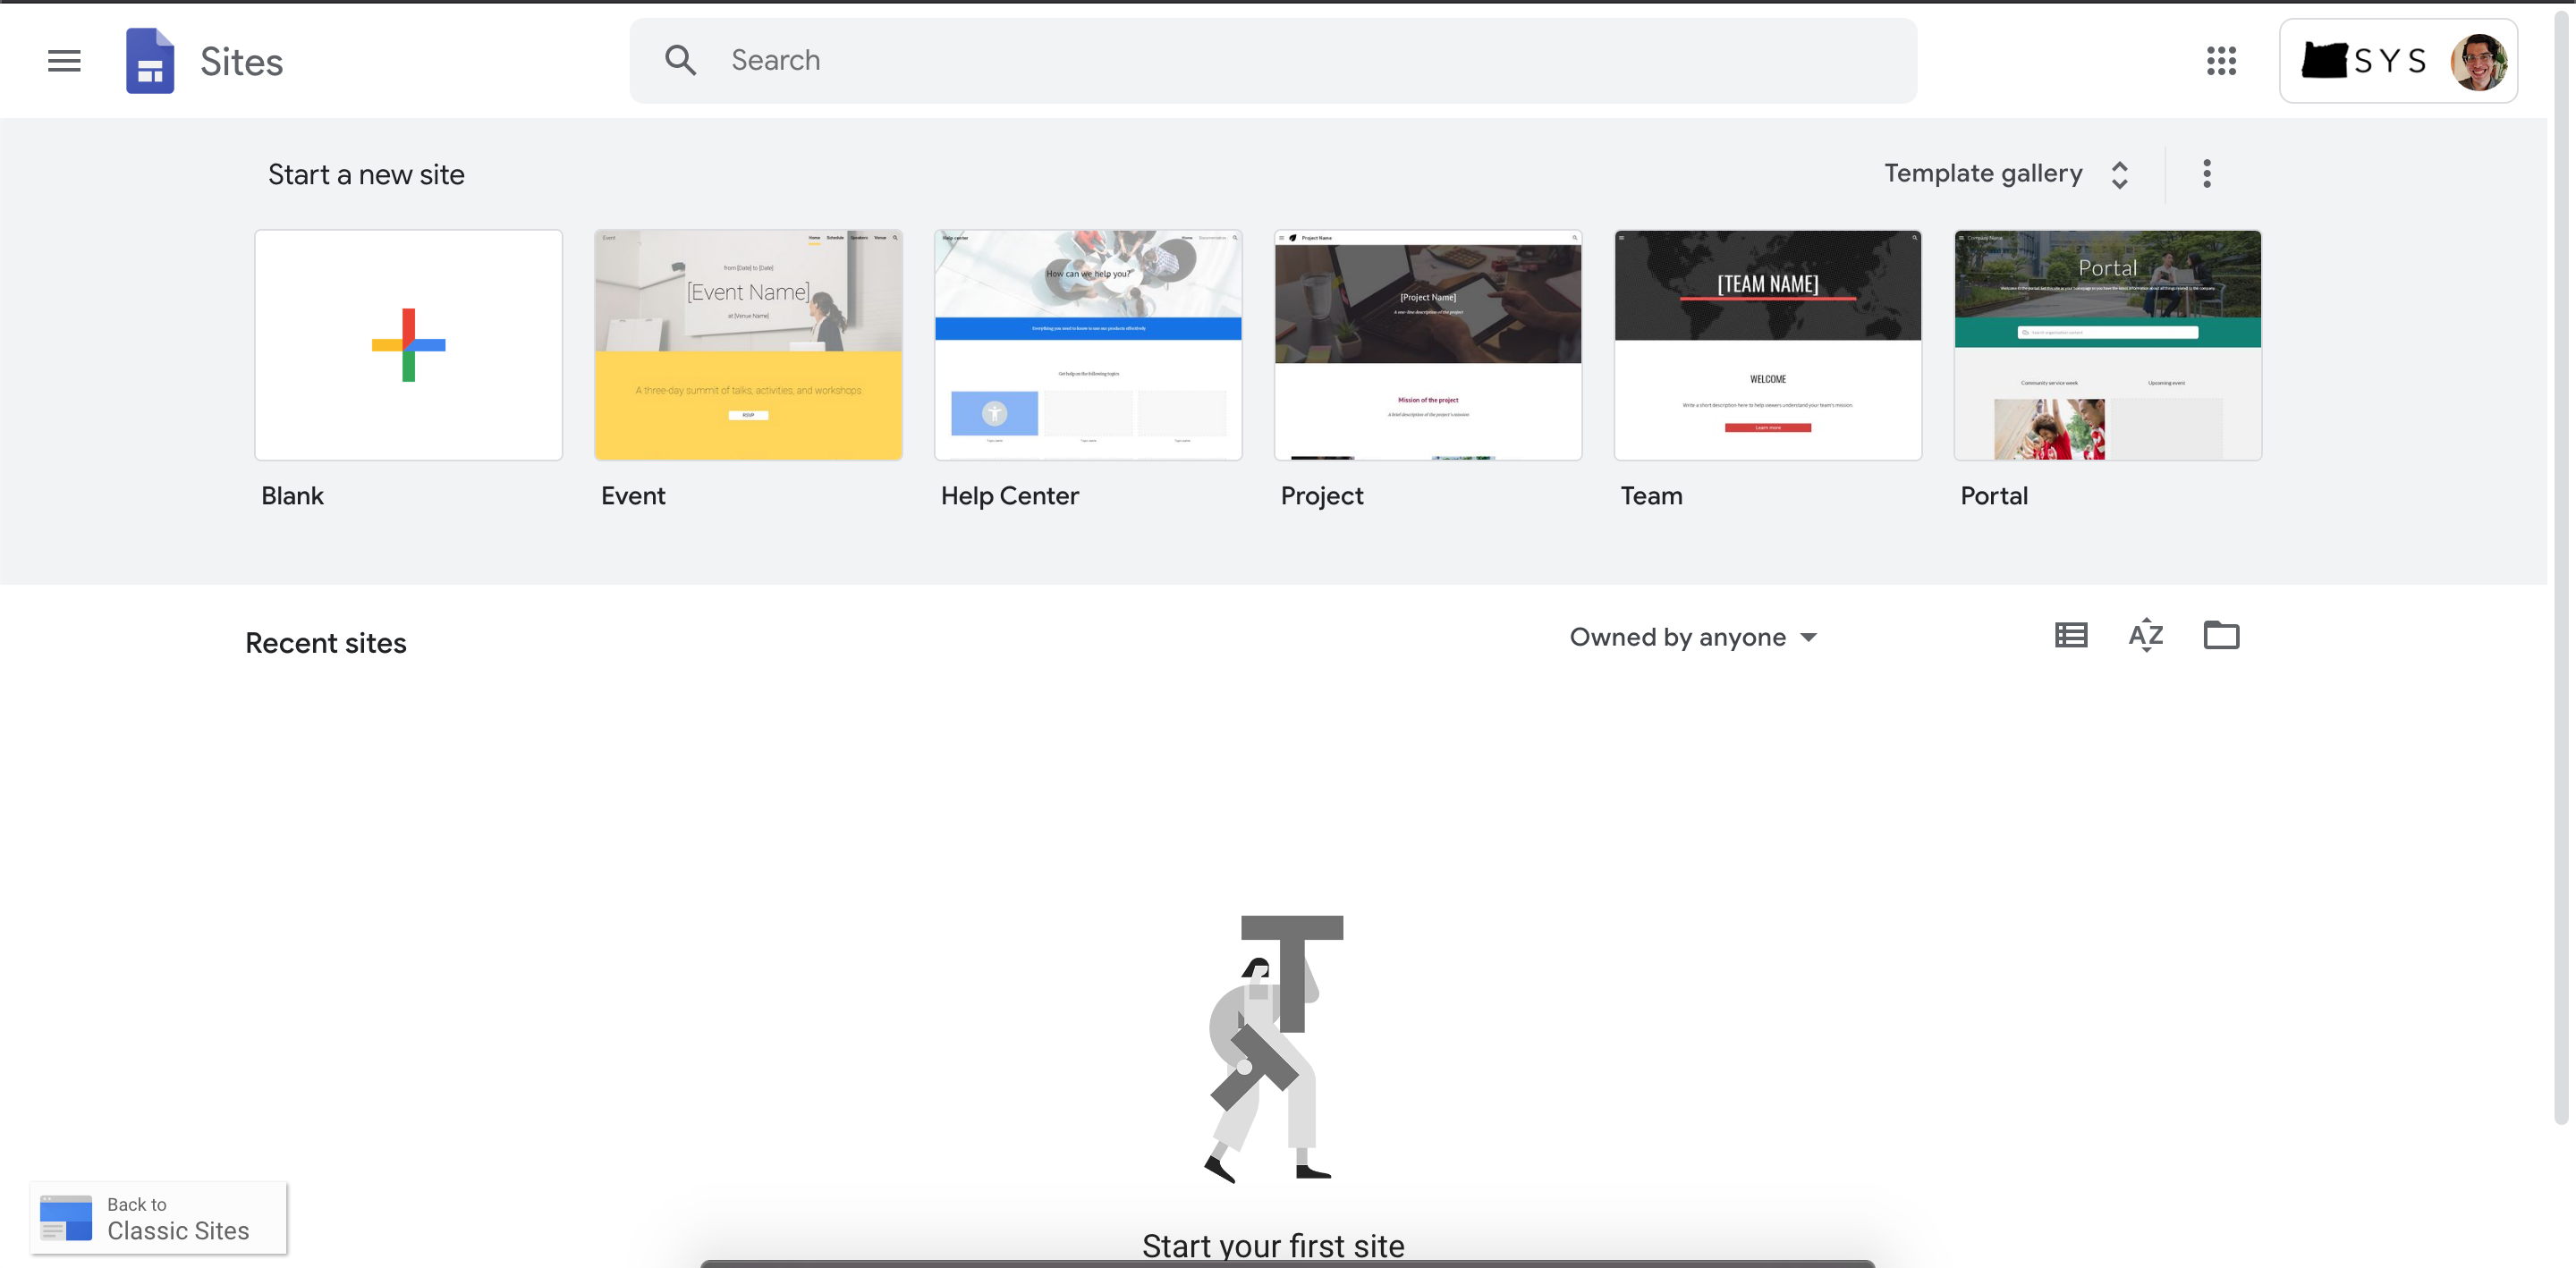
- On your Chromebook, click this link to launch the Google Sites page
- You can also get to there by going to https://sites.google.com/new
- In the top left, click the
 sign to create a blank page. You can also choose from any of the pre-defined templates along the top.
Return to top
Naming your site
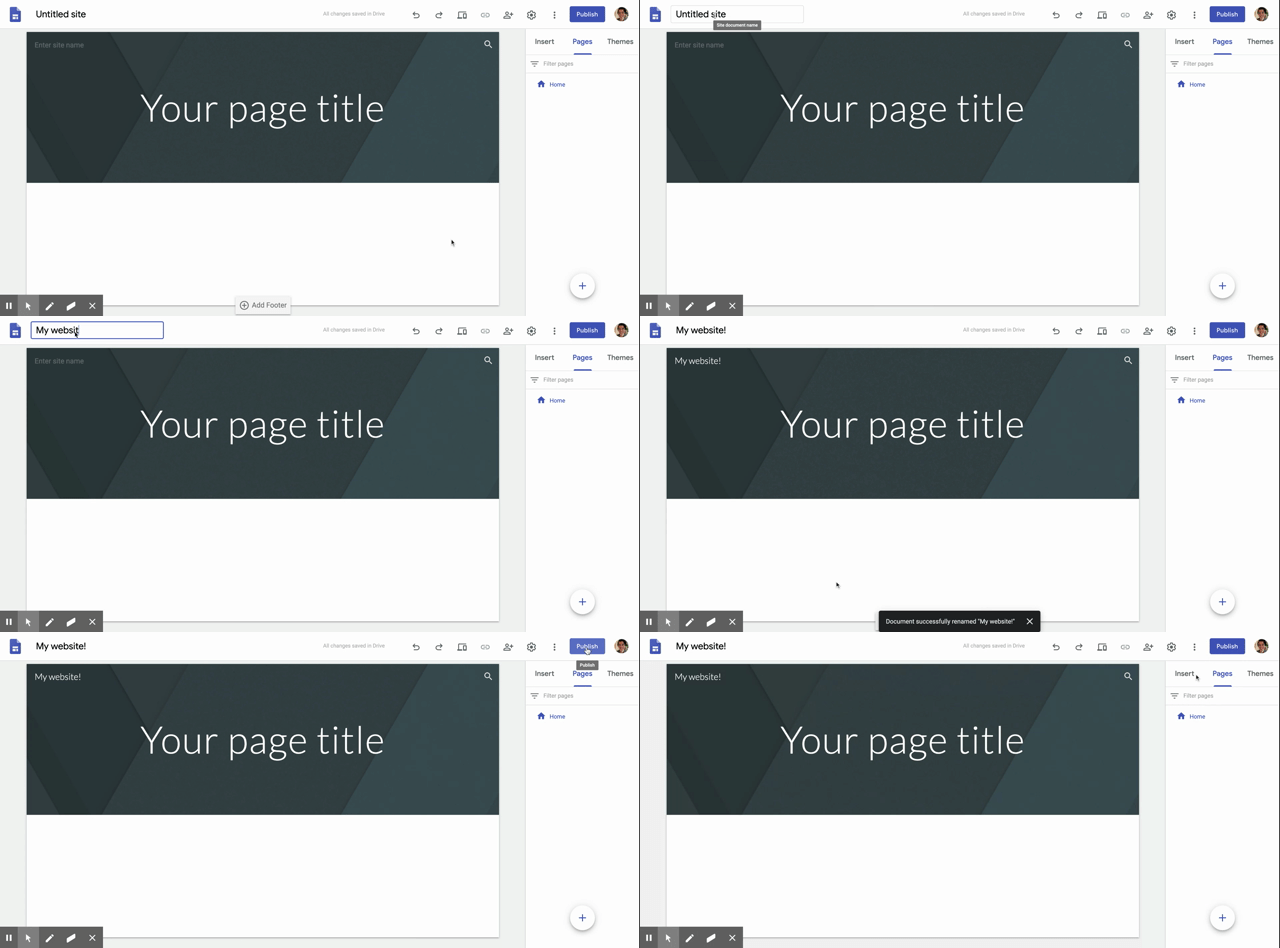
To name or rename your website from the main landing page:
- Double click on the title of the site in the top left
- Type in your new name
- To save these changes, click on the Publish button in the top right
Return to top
Adding Content
Adding a page
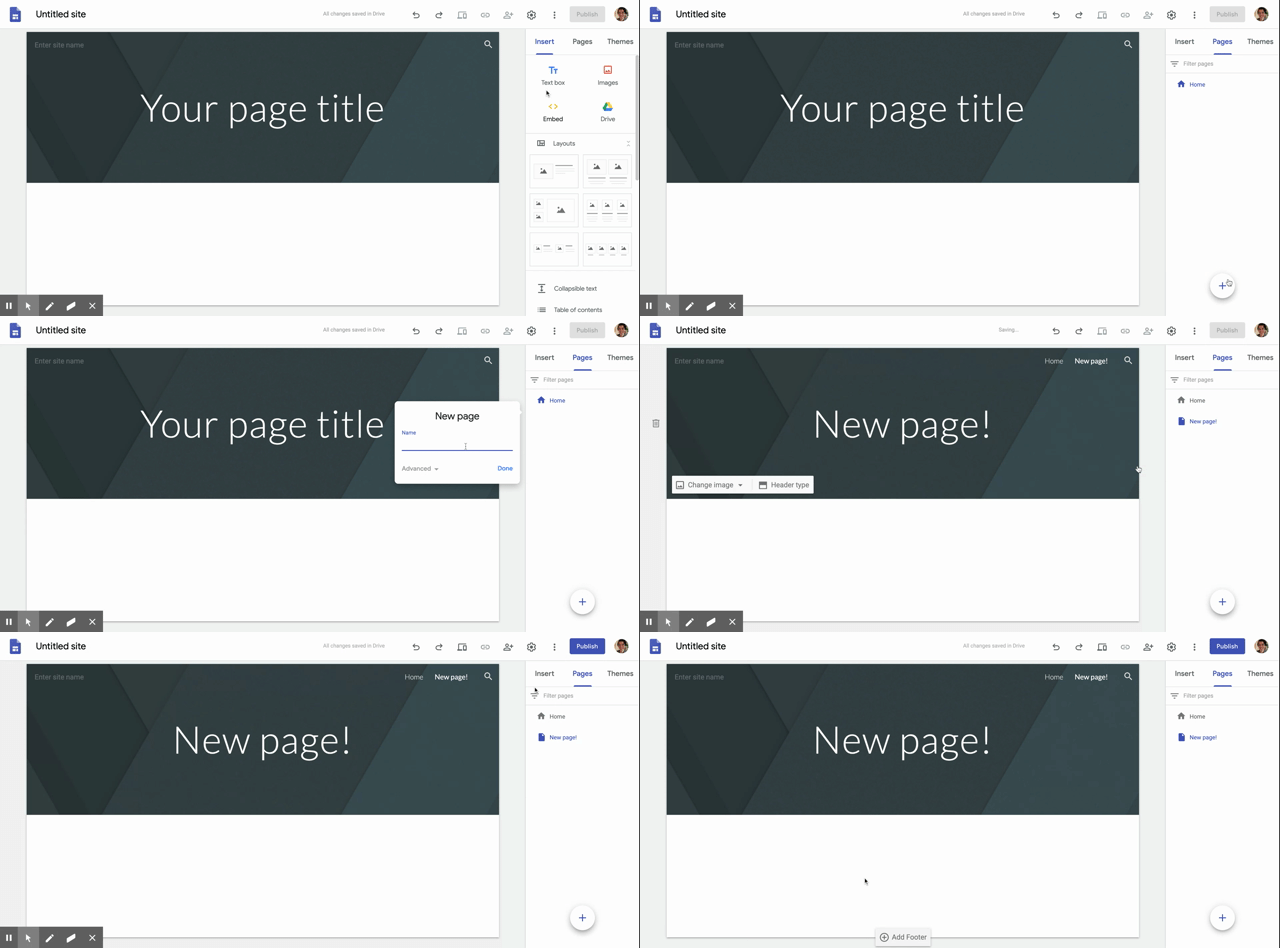
- From the main landing page, choose Pages on the right-hand menu
- Click on the plus (+) at the bottom of the menu and select New Page
- Enter in the title for your page and select Done
- To publish these changes, click Publish at the top right of the page next to your icon.
Return to top
Deleting a Page
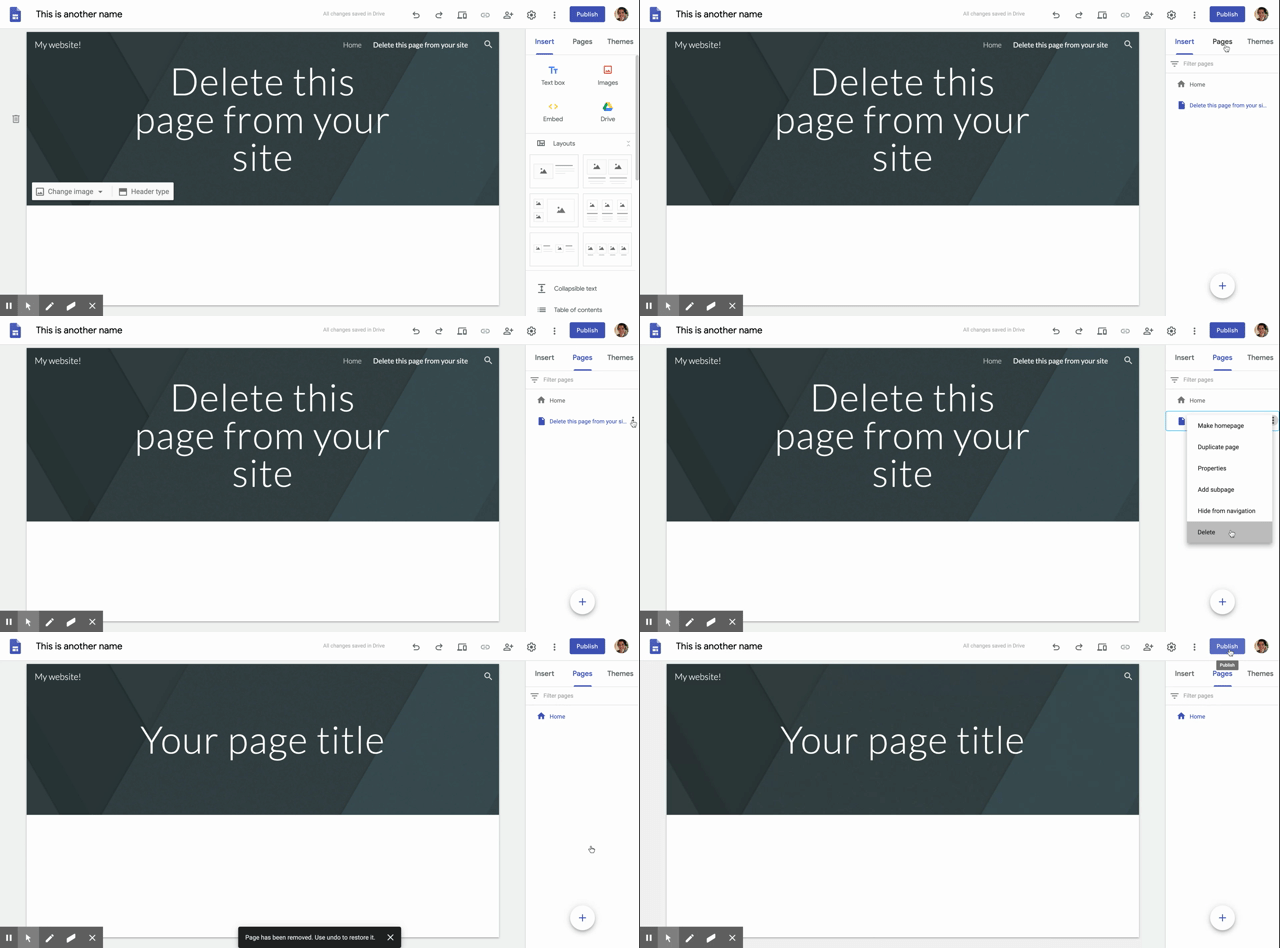
To delete a page from your site:
- From the menu on the right-hand side, choose the Pages section
- Find the page you want to delete and select the
 menu for it
 - Select Delete and click Publish at the top right of the page next to your icon.
Return to top
Copying a Page
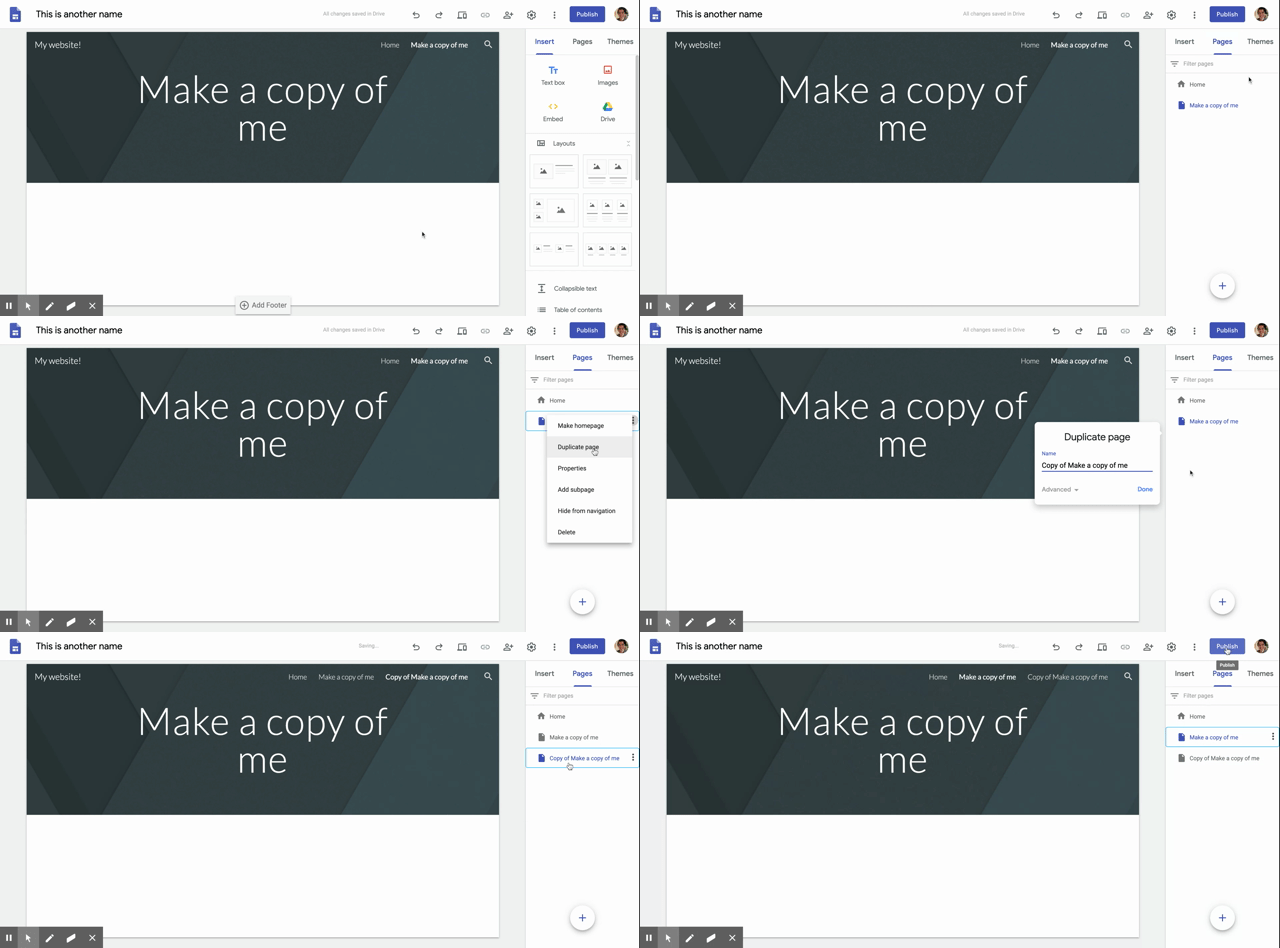
To copy a page from your site:
- From the menu on the right-hand side, choose the Pages section
- Find the page you want to copy and select the menu for it
- Select Duplicate and click Publish at the top right of the page next to your icon.
Return to top
Copying a full site
If you need to copy a full website, we can do that too! Note: If your site is very large, you may receive an error stating that you cannot copy it.
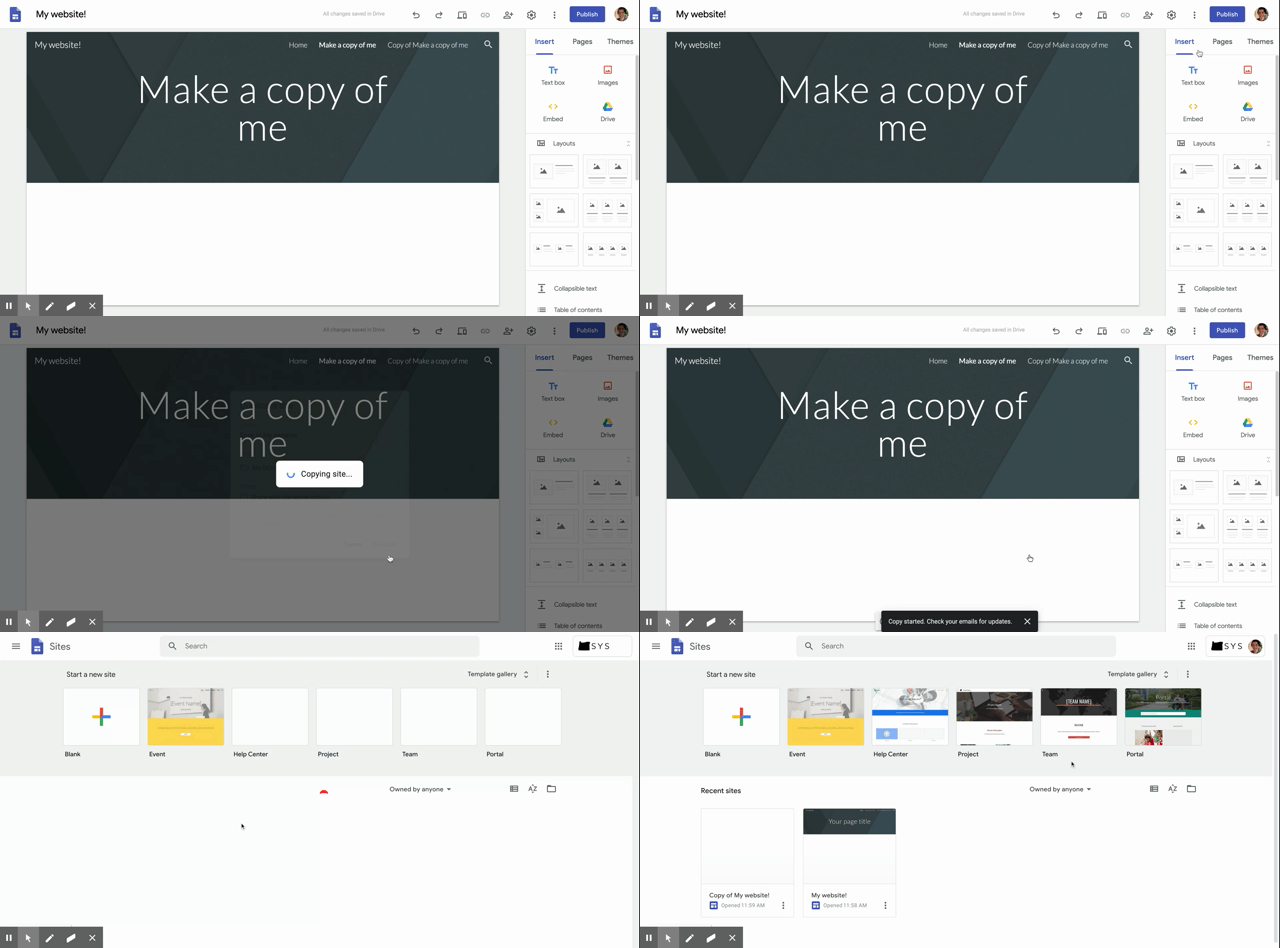
- From the main landing page, click on the menu in the top left corner, next to the Publish button
- Select Duplicate Site from the menu
- Under File Name, type the name you'd like to give the copy of your website
- Click Duplicate, you should receive an email once the copy is complete and can confirm it was successful on the main dashboard where all of your sites are shown.
Return to top
Create a subpage
A subpage is a page on your website which is only accessible through a main page -- much like how you can only get to certain files on your computer by going through a specific folder. This is a great way to categorize similar items -- keep photos of animals under the Photos page for example! You can have a total of 5 levels of subpages.
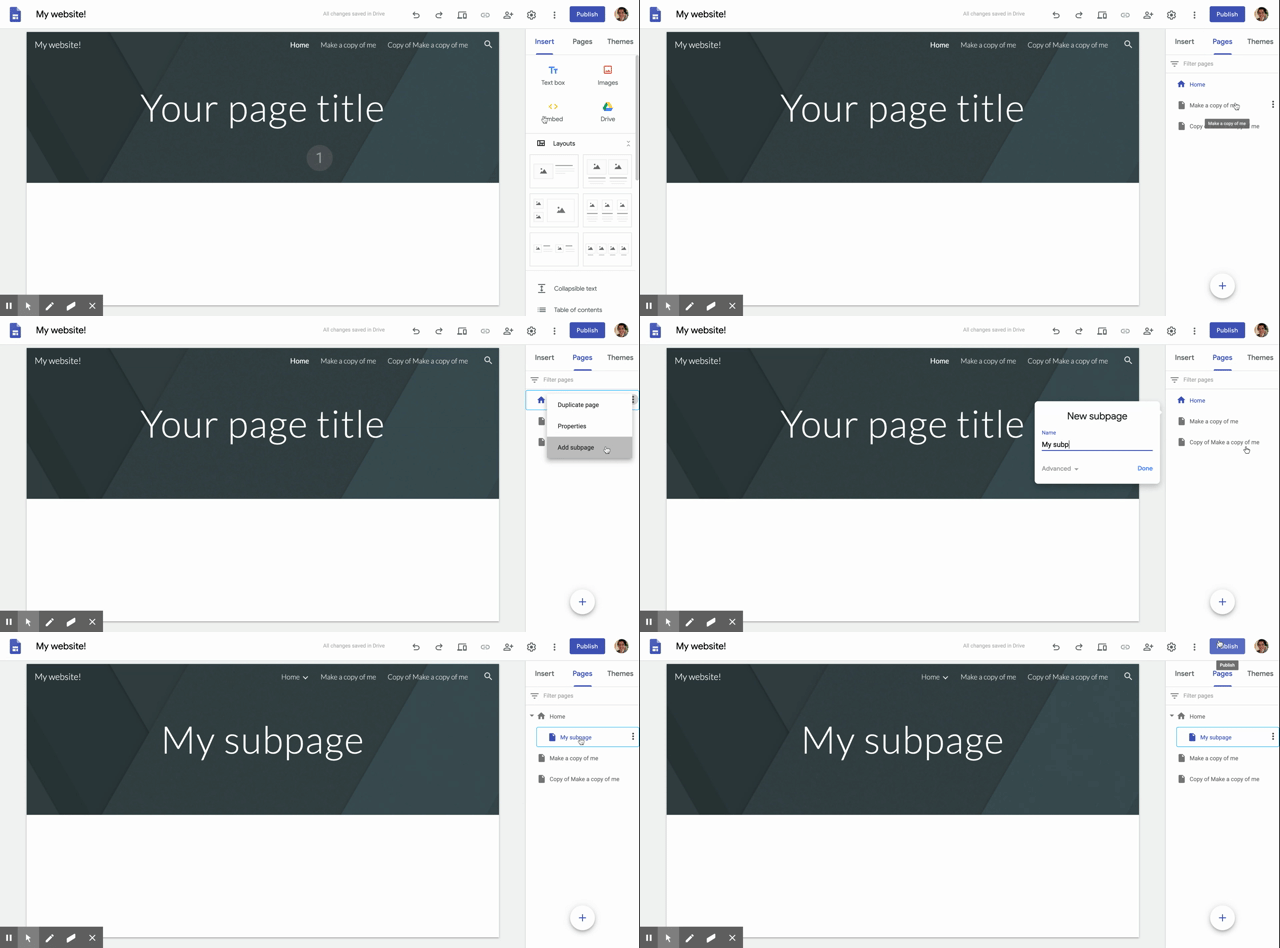
- From the main landing page, pick Pages from the menu on the right-hand side
- Choose the page that you would like t make a subpage for and click the menu
- Select Add subpage and choose a title for it.
- Click Done once you've set your title, you should see your new subpage appear under its' page!
- You can now access it by mousing over the name of the main page and choosing your subpage. Click Publish in the top right to save your changes

Return to top
Organizing your pages
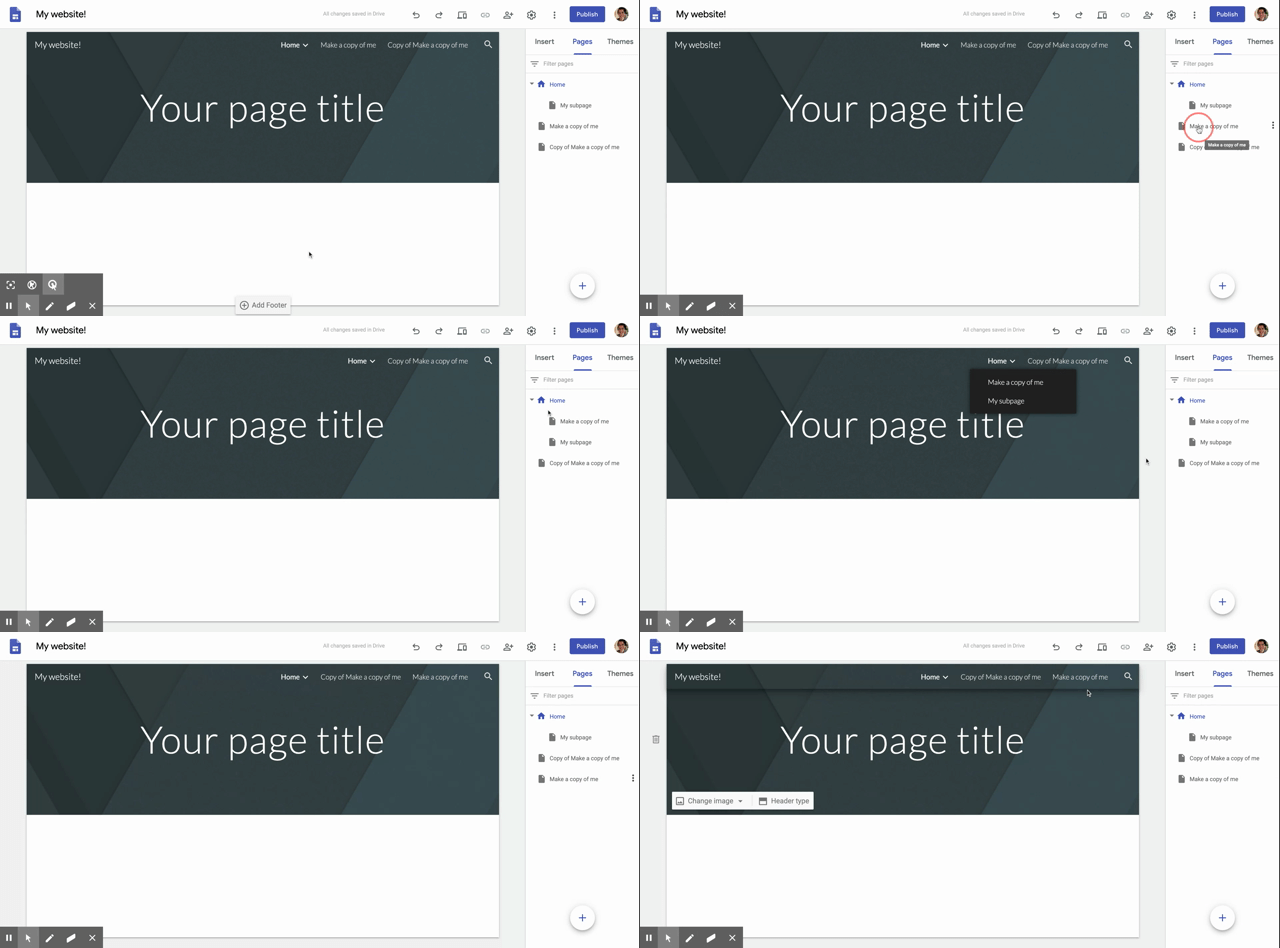
Let's say that you'd rather your subpage be it's own page instead. Or, you just don't like the way that the menu along the top has organized your pages. Don't worry, you can always reorganize by dragging and dropping where you'd rather them be! When you're done, click Publish at the top right of the page next to your icon.
Editing your site
Adding text to your site
Adding text to your site can be useful to let folks know why they're there in the first place!

- From the main landing page, choose the Text box option in the Insert menu on the right
- Add in your text
- Click Publish at the top right of the page next to your icon.
Return to top
Adding Images
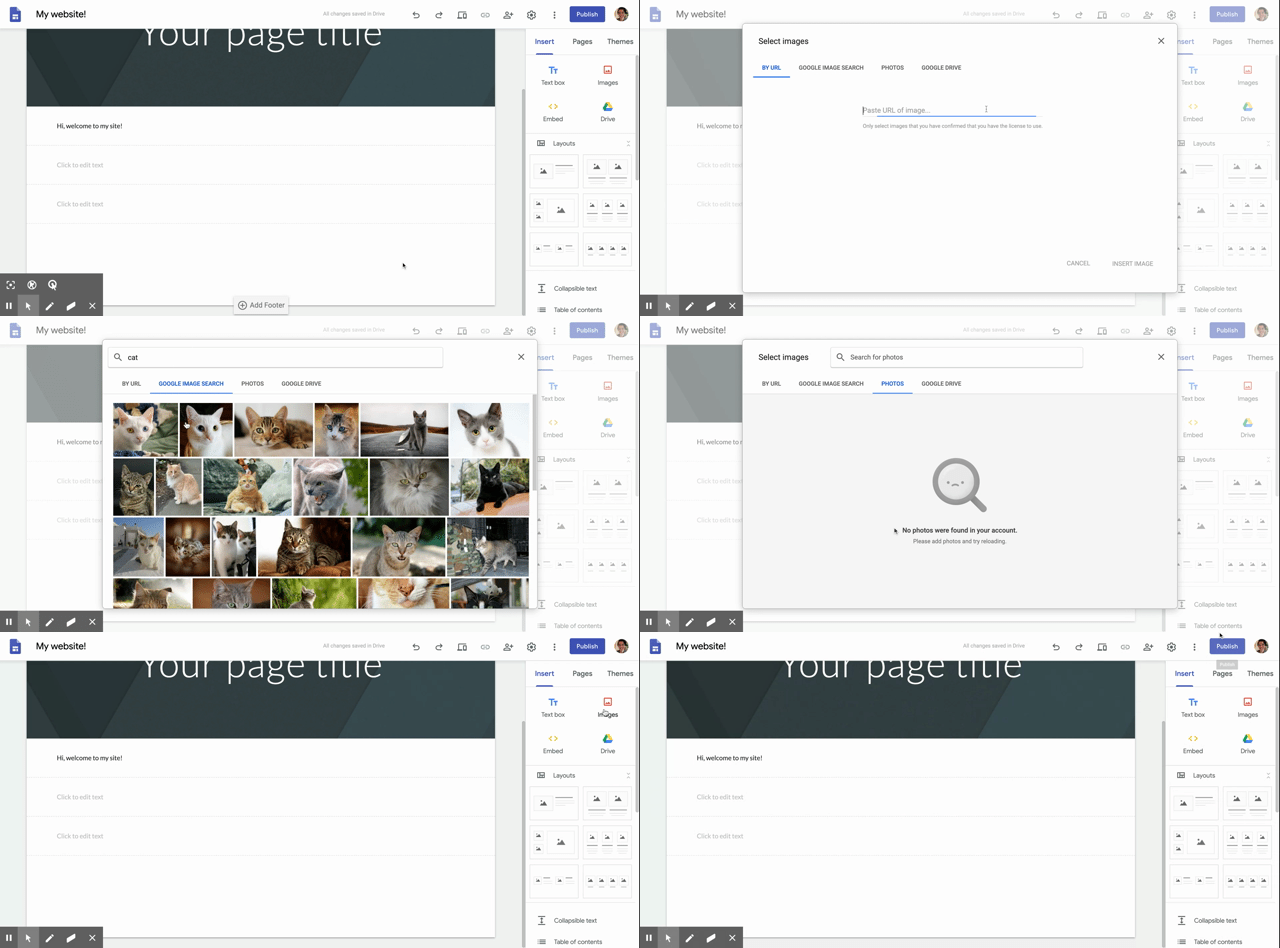
- From the main landing page, choose the Images icon in the Insert menu on the right-hand side
- If you have a picture that you'd like to upload to your Google Site, choose Upload
- This will open up a file window to upload a saved picture that is on your computer
- If you are using a photo from another website on your Google Site, choose By URL
- You can copy in the web address of a photo on another website and link to it from here.
- Ex: www.website.com/photo.jpeg
- If you prefer to use an image from a Google Search, choose Google Image Search
- This is the same as going to images.google.com and searching for a particular picture, but you don't need to leave Google Sites! Make your search, choose your image, and select Insert Image.
- If you have a picture stored in your Google Drive you want to use, choose Google Drive
- If you've already saved a photo anywhere in your Google Drive, you can pull it directly from here. Very useful if you have to use specific photos fro your class!
Return to top
Adding Buttons
Adding a button is a great tool if you'd like to link to a specific page on your site -- clicking it will take you directly there.
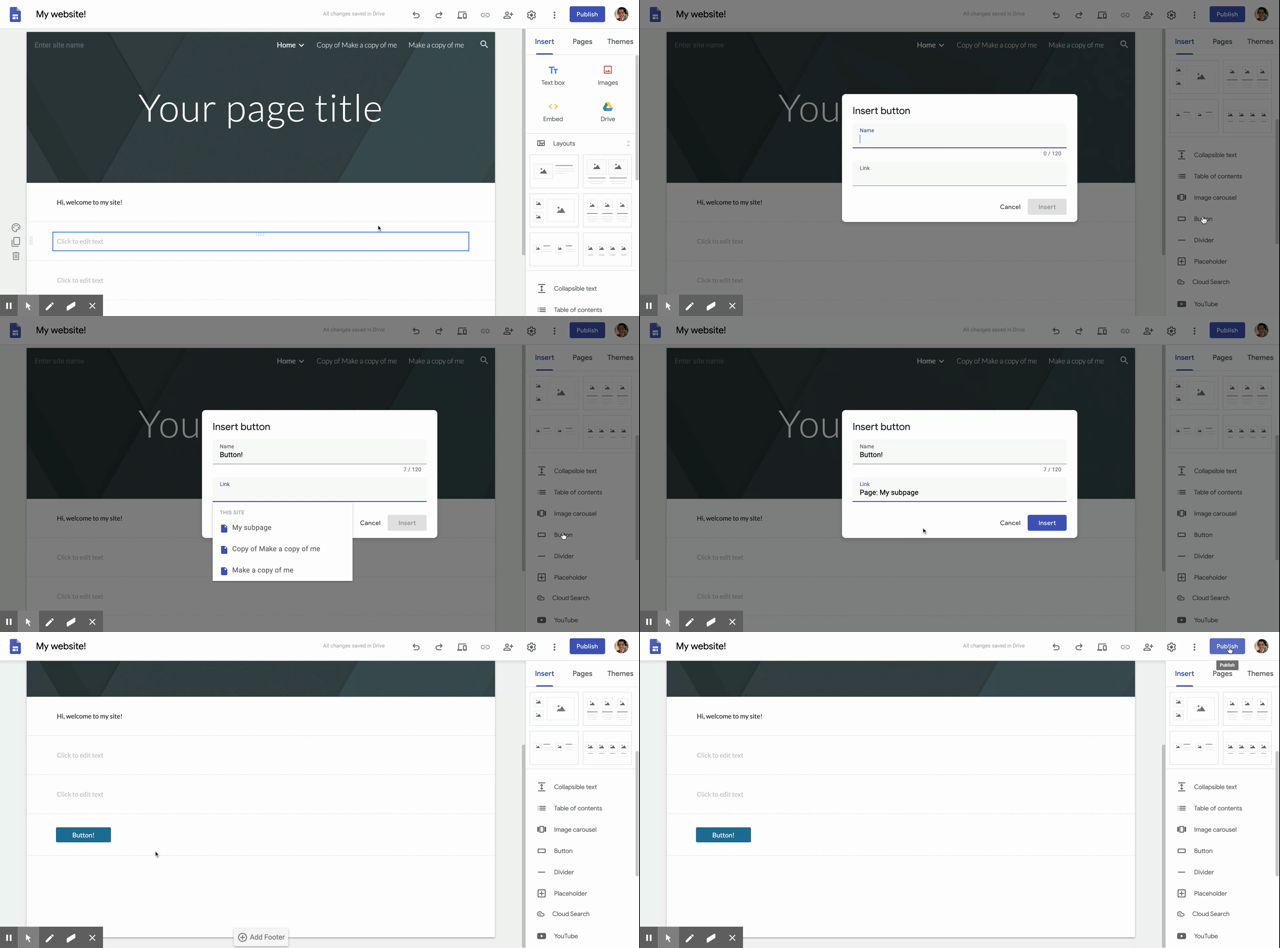
- From the main landing page, choose Button from the Insert menu on the right-hand side
- Type in your button's name
- Choose the page you'd like to link to
- If you'd prefer to link to an external site, you can type in the URL here (ex: https://google.com)
- Click Insert, you can now reposition your button as needed and change its' formatting by clicking on it.
Return to top
Adding Google Docs, Sheets, and Slides
You can directly embed your Docs, Sheets, Slides and so much more on your site! Instructions are the same for all of these, below we have an example of Google Slides which has a few more options.
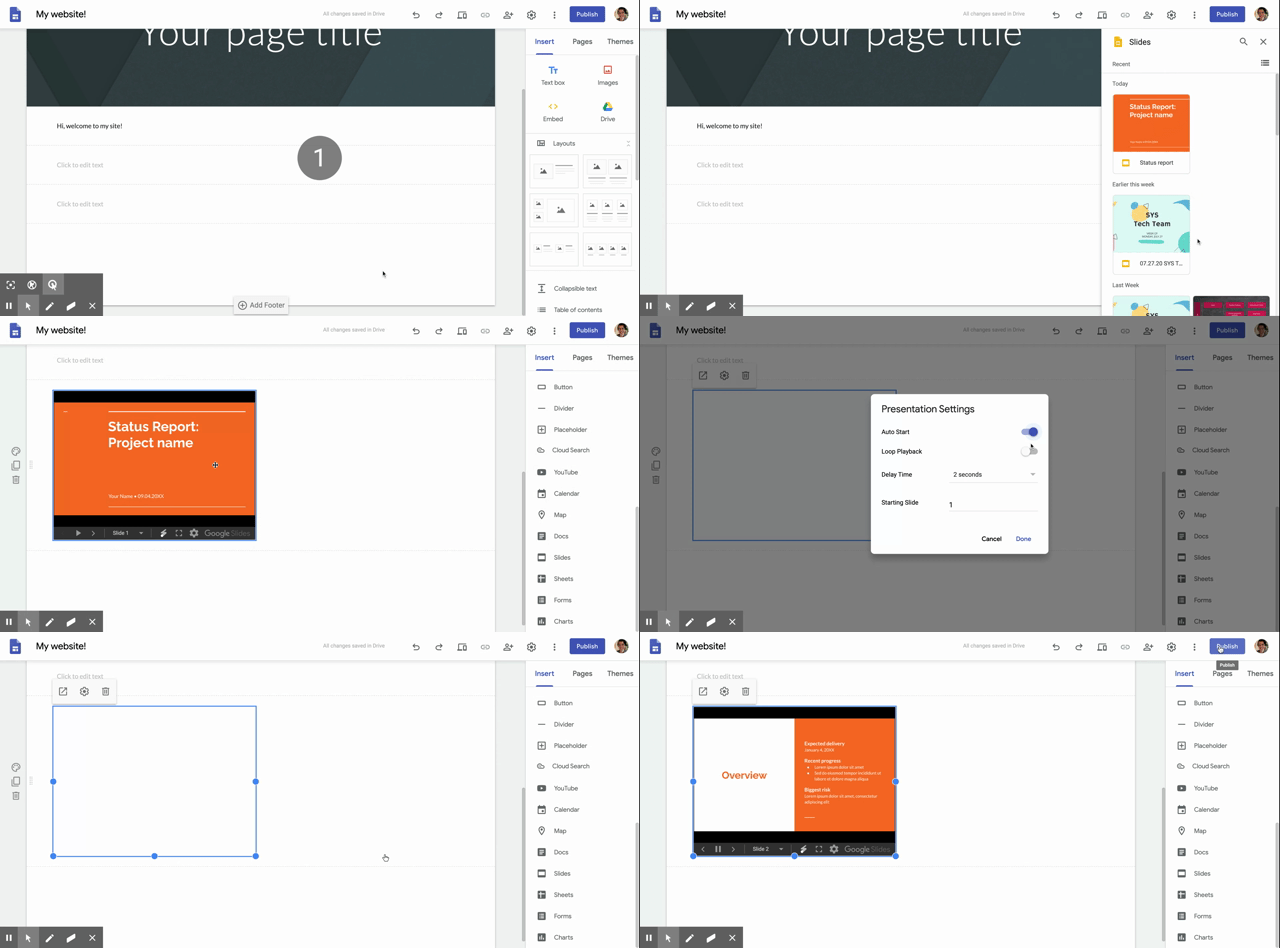
- From the main landing page scroll down the Insert menu on the right-hand side till you see Slides
- Choose Slides from the menu and pick which one you'd like to embed
- These options are pulled directly from your Google Drive. If you don't see the slide you want to show off on your site, double check that it's in your Google Drive
- To publish these changes, click Publish at the top right of the page next to your icon.
- That's it! You can now configure some Presentation settings or allow your site visitors to click through the slides manually.
- If you'd like your slides to autoplay, click anywhere on the slide and choose the Gear icon
- Switch Auto Start to on
- If you'd like your slides to loop, make sure that Auto Start is already on and choose Loop Playback
- You can adjust the amount of time spent on a slide under the Delay Time drop down menu
- Want to start on slide 5, 3, or 524? You can choose which slide that you start on under the Starting Slide option. Just delete the 1 and type in which slide you'd rather begin with.
- If you'd like your slides to autoplay, click anywhere on the slide and choose the Gear icon
Return to top
Changing your theme
If the default theme is just not doing it for you, you can always switch it up with any of the built-in themes that Google Sites has.
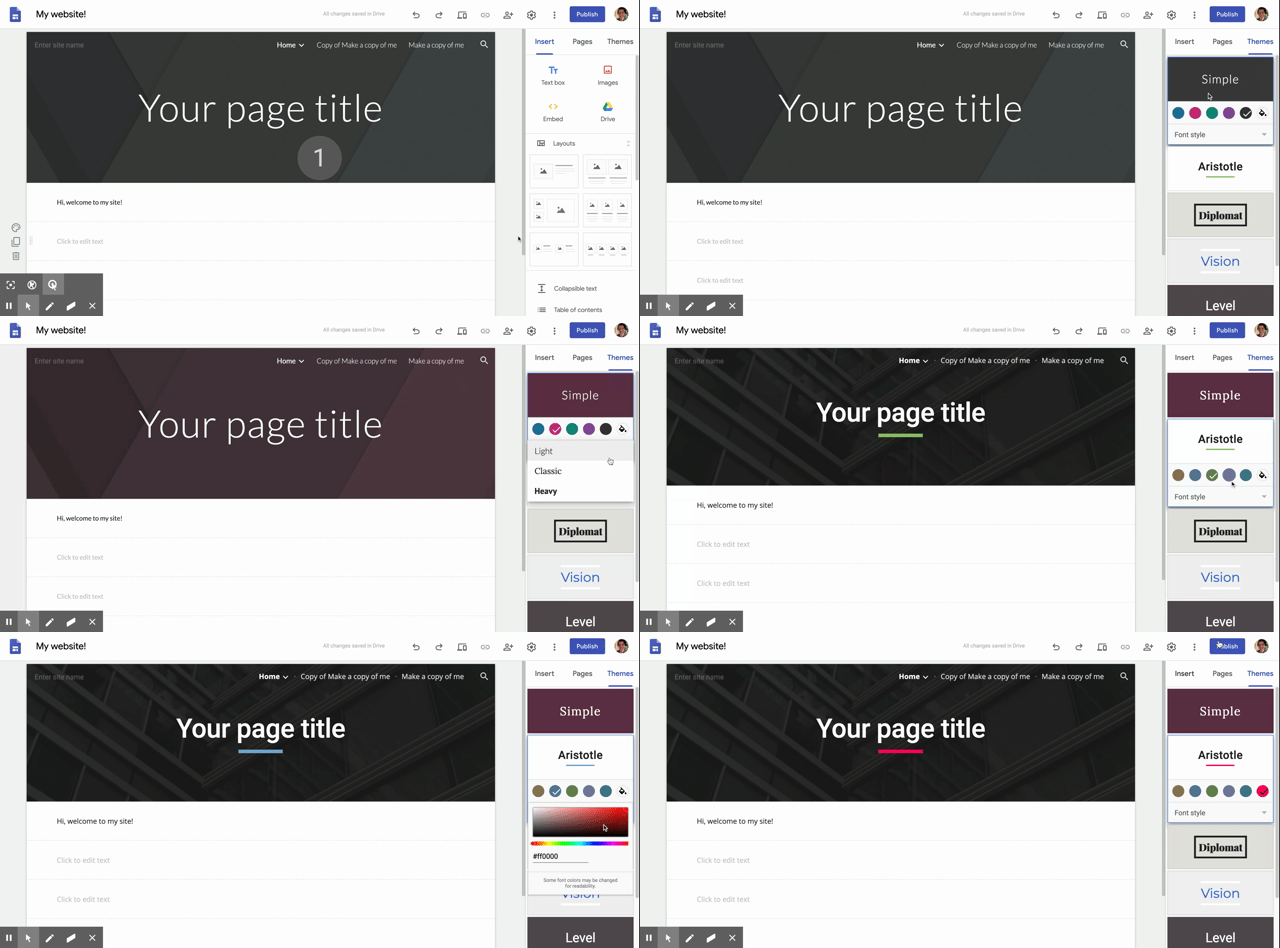
- From the main landing page, choose the Themes menu on the right-hand side
- You can change the accent color by picking any of the colors below your theme name or the paint bucket to choose a custom color
- You can switch themes completely by clicking on any other theme name
- To publish these changes, click Publish at the top right of the page next to your icon.
Return to top
Publishing your site
Previewing your site
So you're done building your site, but are curious what it looks like on a phone, tablet, or just in a browser. Follow the steps below to preview your site.
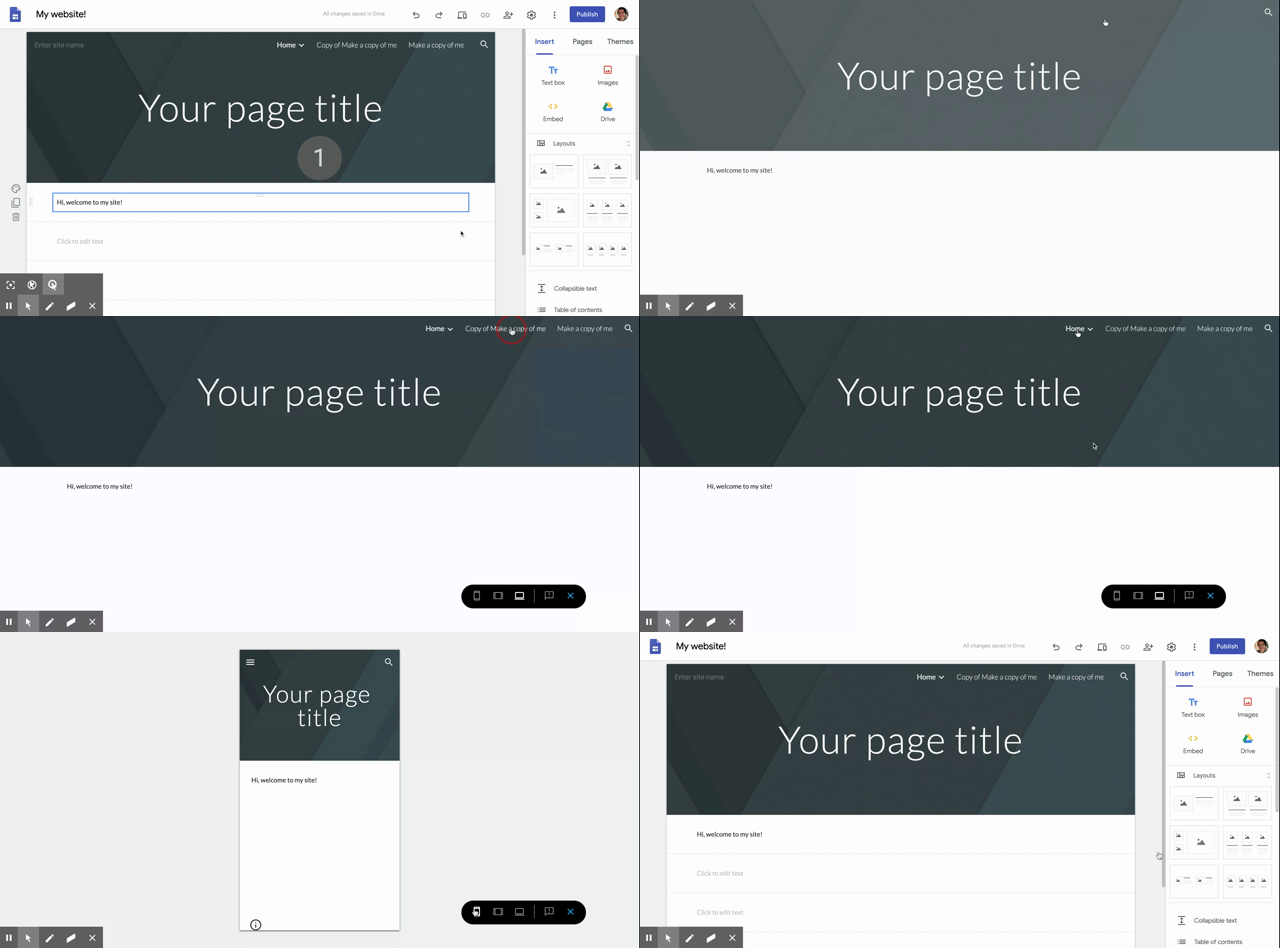
- From the main landing page, choose the Preview
 button along the top menu
 - The default view will be of a browser on a computer. You can switch between a phone or tablet as well from the controls on the bottom right.
- When you're done, click the X button on the controls to go back to your site's editor.
Return to top
Publishing your site
When you're ready and satisfied with how your site looks, or just want to save it after making some changes, go ahead and publish it
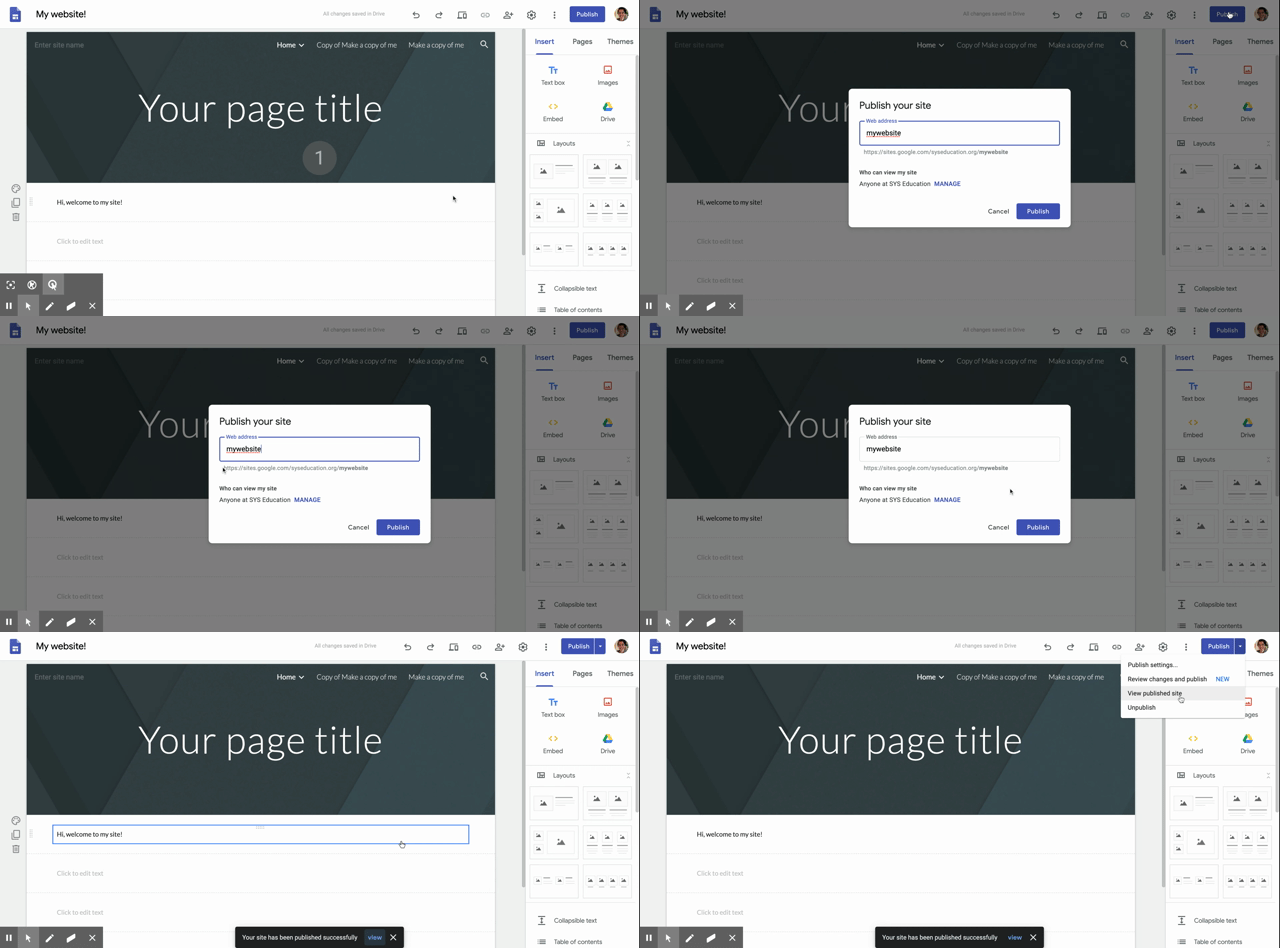
- From the main landing page, select the Publish button at the top right of your screen
- If you'd like to change your website's name, you can do so here before publishing
- Below your website name, notice your web address. You can share this out to other folks so they can visit your website
- Click Publish.
- To see what your website looks like as someone visiting it, click the arrow next to the Publish button
- Choose View Published Site, a new tab should open and you can view your live website.
Return to top
Delete or Restore a site
Delete a website
Let's say you're just done with your website and want to get rid of it. No problem!
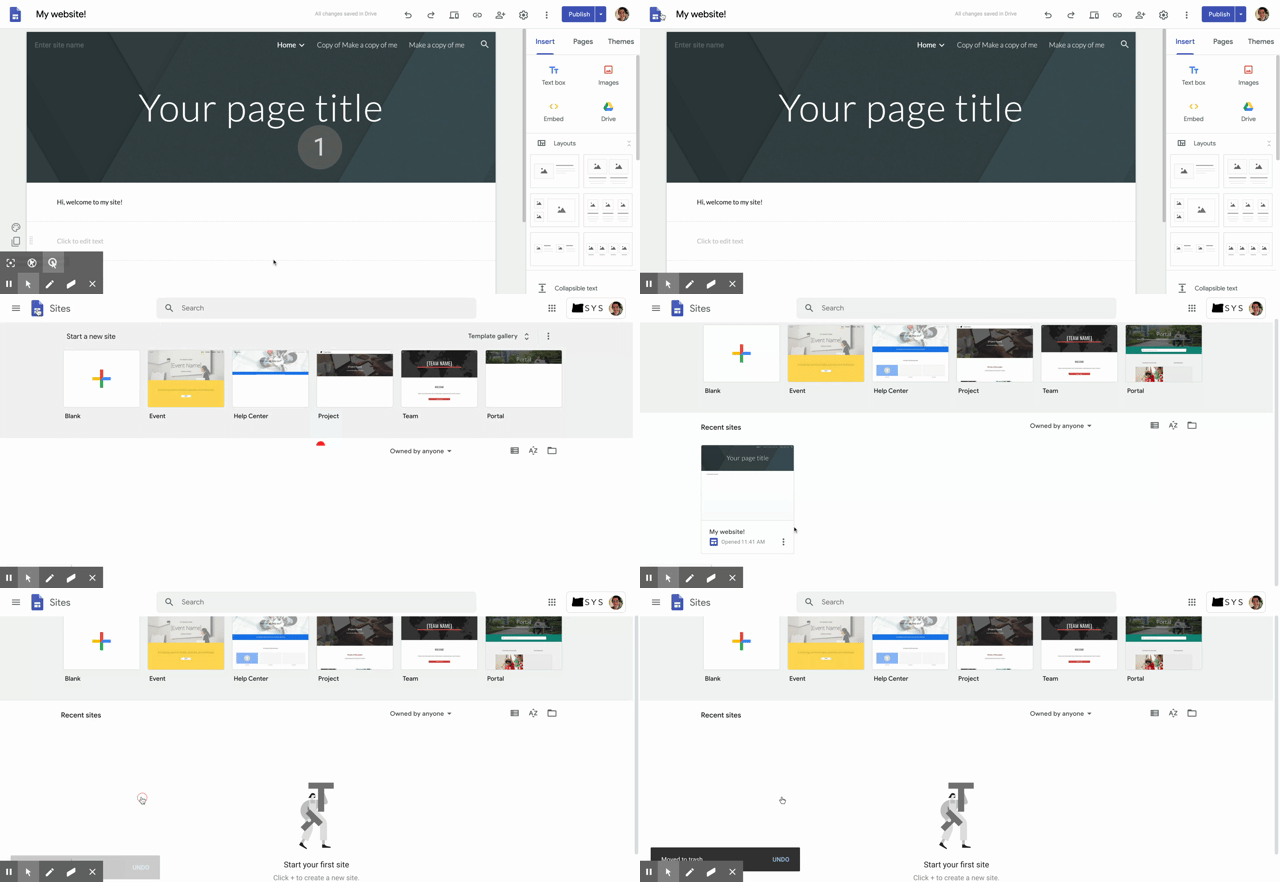
- Go to your Sites Dashboard by clicking the Sites icon in the top left
- You can also visit https://sites.google.com/
- Click the menu next to your site's name and choose Remove
- Done, your site is now deleted!
Return to top
Restore a website
Oh no, I deleted the wrong site! How do I get it back?! No problem at all, we've got you covered!
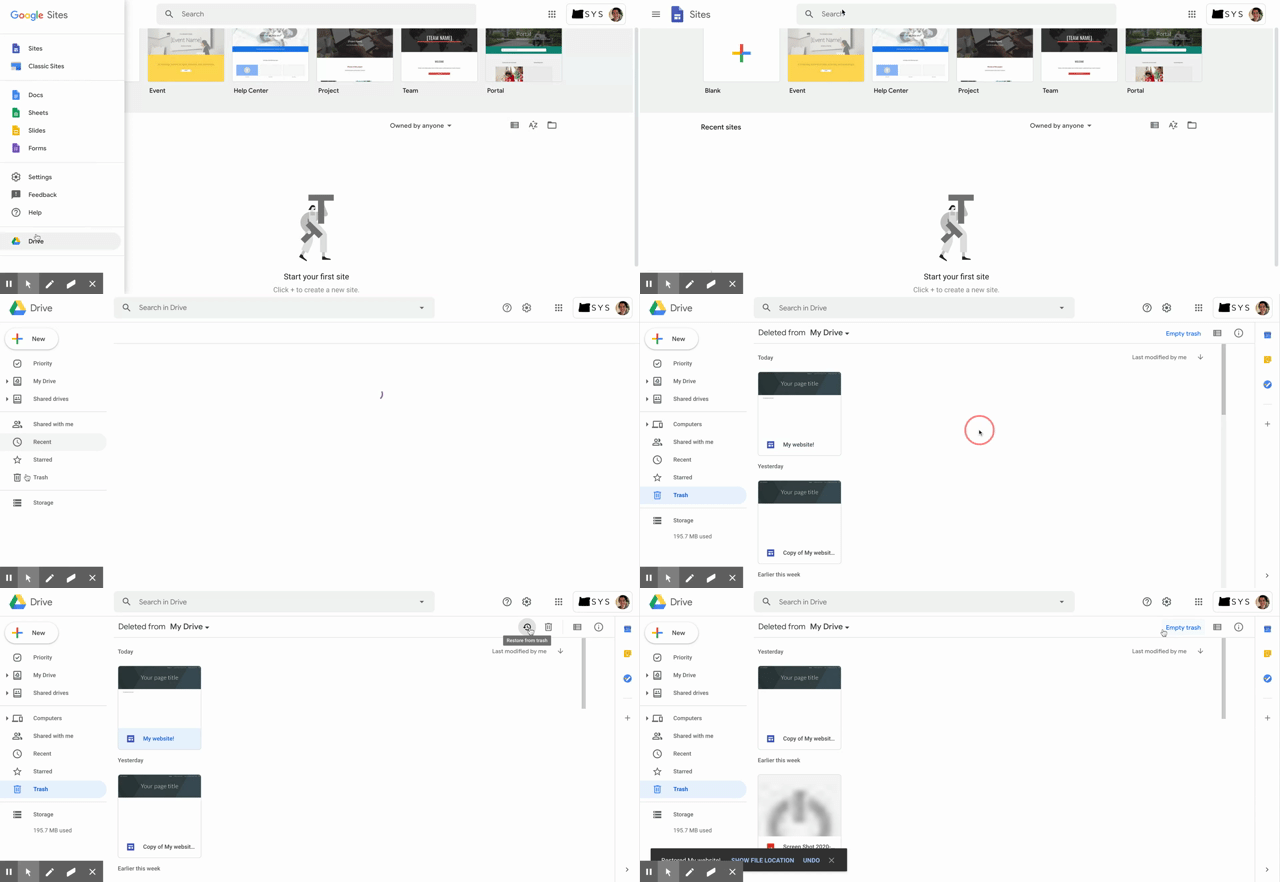
- Head over to your Google Drive
- Click on the
 menu in the top left and choose the Google Drive icon
- Go to https://drive.google.com
- Click on the
- Click the Trash
 icon on the left-hand side of the screen
 - Select the site that you'd like to restore and click the Restore
 icon in the top right
 - Head back over to https://sites.google.com to confirm it was successful!
Return to top
Still can't get your site to work?
If you're not finding the information you need in this article, please get in contact with the support team. You can find how in this Guide Article:
Comments
0 comments
Article is closed for comments.