
What is Google Docs?
Google Docs is a cloud-based text editing software, meaning you can write essays, take notes, record journal entries, or complete any number of homework assignments from anywhere while logged into your ORCA account. Documents created in Google Docs are automatically saved to Google Drive so you have access to them anytime, anywhere. Follow this guide for more information about using Google Docs to its fullest. You'll learn how to
- Create a new document
- Make basic edits to your document
- Share your document and make comments or suggestions on someone else's
as well as some useful features, such as:
Create a new document
There are a few ways you might create your Google Doc. The two most common are
- From your Google Docs homepage
- By making a copy of your teacher's Google Doc
From Google Docs homepage
1. Open your Chrome browser ![]() and make sure you're signed in to your ORCA student account.
and make sure you're signed in to your ORCA student account.
2. Type docs.google.com into the address bar.
3. Select either Blank to start your own blank document OR select Template Gallery to choose from some pre-made templates.

Make a copy
Your teacher might embed a link to a Google Doc in your Canvas course with instructions to make a copy. Lucky for you, most of the work is already finished! Simply click on the link and then select the blue Make a copy button on the opened tab.

No matter how your document is created, it will be automatically saved to Google Drive. If you need to pause your work and come back to it later, you can find it in Drive or from the Docs homepage under Recent documents.
Make basic edits
Google Docs is a fully-featured text editor, similar to Microsoft Word or Apple Pages. If you've ever used either of those editors, much of Google Docs will be familiar to you. Still, let's take a look at what it has to offer!
Name your document
First, let's name your document. In the top left corner, you'll see a slightly greyed-out Untitled Document. Click here, and type your descriptive title. Make sure it's something you can recognize later so it's easy to pick out in Drive or Canvas.

The toolbar
You can do a lot with your options in the toolbar, but let's take a look at some of the common ones.
![]()
Font: Change what your text looks like
![]()
Font Size: Change how big or small your text is
![]()
Bold: Make your text thicker for emphasis
![]()
Italics: Add a slant to your text for context (used when writing titles, for example)
![]()
Underline: Add a line under your text to make it stand out
![]()
Text alignment: Orient your text to the right, left, or center. You can also justify your text, which stretches each line to the margins.
![]()
Line spacing: Increase or decrease space between each line. Look to this tool if your teacher asks for your essay to be "double spaced".
Word count
Your teacher might ask for a specific number of words for your assignment. Rather than counting each word by hand (trust us—you don't want to try this), use Google Doc's Word Count tool!
Click Tools in the menu bar just beneath the document title. From the dropdown menu, select Word count. Google Docs will present a brief summary of your total words, pages, characters, and characters excluding spaces.
Check the box next to Display word count while typing for a running total visible while you're working on your document.

Share your document
Sharing tools in Google Docs makes it so that each project is a living document—meaning that it can be changed over and over again before being finalized. Google Docs allows users to share documents with one another in a couple of useful ways.
Share with people and groups
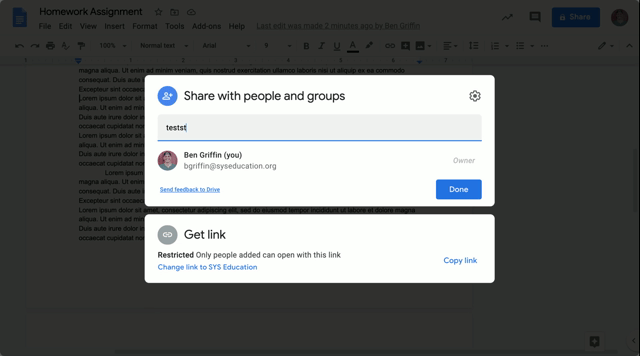
1. Click the blue Share ![]() button at the top of the page.
button at the top of the page.
2. On the window that appears, add one or more email addresses for anyone you'd like to give access to your document.

3. Once emails have been added, there will be a dropdown menu to choose whether the recipients have permission to edit the document, can make suggestions to edit the document, or can view it only. We'll talk more about Suggesting mode later.
4. Click Done to automatically send a copy of your document to each recipient's own Google Drive, so they may access the document later.
Share to anyone with the link
Just below the Share with people and groups menu, you'll see another window called Get link. You have a few options here. First, you can simply click Copy link to automatically copy the link to your clipboard to be pasted anywhere later. You might use this option if you'd like to save the link to your bookmarks bar or send the link via email.

Click the small arrow next to Restricted to pull down a drop down menu with options to restrict who can and can't view your document even if they have the link. You can choose to allow
- only those who you added above
- anyone at ORCA
- anyone on the internet with the link
to view your document. What you choose will vary, but remember that you can always change this setting later by clicking the blue Share button again.
Comments and Suggesting mode
Remember when we mentioned that Google Docs allows users to create living documents that can be changed again and again before being finalized? The next feature is a big reason why this is possible. In Google Docs, you can
- make comments on your Google Doc and invite others to do the same
- enter Suggesting mode, where edits you (or another contributor) make won't be saved until approved by the creator of the document
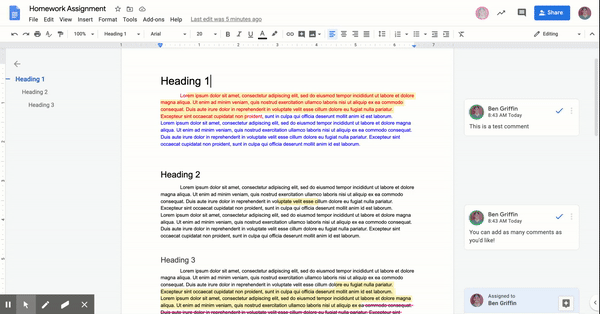
Comments
To add a comment to your Doc, highlight the section of text you wish to comment on and click the Add comment button, which appears near the highlighted text on the border of the document.

A small window will appear to the right of your document. You can type your comment into the text field, then click Comment.

Your comment will be saved to a comment card to the right of the document. Click anywhere on a comment card to add a reply. Comments and replies to comments will be logged and emailed to everyone involved, so you can always stay up-to-date with changes made to your document.

To view a comprehensive history of comments made, click the Open comment history ![]() button in the top right, next to the Share button.
button in the top right, next to the Share button.
Suggesting mode
Suggesting mode restricts changes to the document from being final and instead turns them into suggestions for your review later.
To enter Suggesting mode, look for the drop down menu to the top right of your document, just below the blue Share button. Depending on your screen resolution, it will either look like this ![]() or like this
or like this ![]() . Click the small arrow to bring up your options, then select Suggesting.
. Click the small arrow to bring up your options, then select Suggesting.

Once in Suggesting mode, highlight some text and make a change. For example, press the backspace or delete button on your computer and notice that the text isn't actually deleted, but rather Google Docs draws a line through it and makes the suggestion to the right of the document. You can add a comment for context.
When you share your document with another user, you can force them to use suggesting mode—rather than allow them to make edits directly—by designating them Commenter when you share the document with them.
Useful Features
Table of contents (outline)
Making a table of contents—called an outline by Google—in your Google Doc is extremely useful and, thankfully, much easier than it sounds! When you designate any text on your document as a Heading, Google Docs automatically adds it to the outline, meaning you can quickly access that exact location in the document at any time. This feature is very useful for long documents such as a running journal your teacher asks you to log throughout the semester.
First, let's pull up the outline. It'll be empty for now, but you'll quickly see it fill up. To the left of your document, you'll see a slightly greyed-out button ![]() . Click it to open the outline, where you'll see a brief message telling you "Headings you add to the document will appear here."
. Click it to open the outline, where you'll see a brief message telling you "Headings you add to the document will appear here."
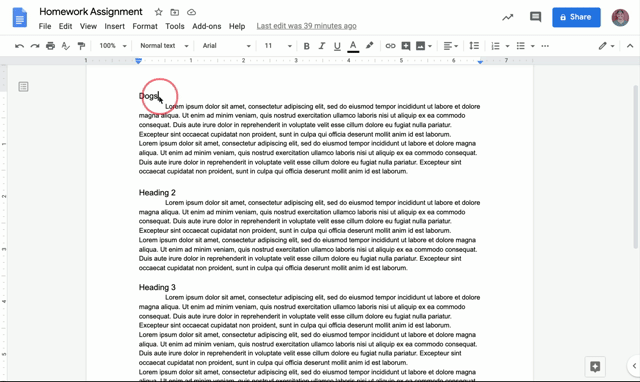
Great, let's add some headings! Highlight some text—probably best to pick something that might be used as a title for a section—then find the drop-down menu marked Normal text just next to the Font selection drop-down menu.
![]()
Click it to pull down some formatting options, including one to change the selected text into a Heading. Choose any of the 4 Heading options, and watch as it appears in the outline to the left.

And there you have it! Clicking on any of the items in the outline will jump you right to that section of the document. Very handy if you have a few months worth of journal entries to scroll through!
Voice Typing
Whether you are jotting down some quick notes or you're two hours into a long essay, you might consider using Google Doc's Voice typing feature, which uses your computer's built-in microphone to record what you say and then transcribes it directly onto your document.
To use this feature, click on Tools in the menu bar and select Voice typing from the drop-down menu.

Note: You may need to allow access for Google Docs to use your microphone first.
Once Voice typing is turned on, you'll see a small, moveable menu appear to the left of your document.

You can move it anywhere you want, probably somewhere out of the way. You can also change the language setting. Click the microphone icon to begin recording, and watch as your words are instantly transcribed into your document.

You will know Google Docs is recording because the microphone will turn red and you'll see an indication on the Chrome tab that Docs is open in.
![]()
Explore and Define tools
Two more useful tools you can use in Google Docs are Explore and Define.
Explore
This tool allows you to do some quick research on any topic without even leaving Google Docs. To use Explore, highlight any text on your document and open the Context menu by holding the Control button down on your keyboard while you click on the highlighted text. (If you are using a mouse instead of the Chromebook's trackpad, you can also right-click to pull up the context menu.)
Find the option to Explore '[highlighted text]' and click it. A panel will open to the right of your document. You can do a Cloud search of your Google Drive, which will pull up and documents saved there that might be related to the text you searched. Or, you can search the Web, which pulls up a quick Google search directly in the Explore panel. Finally, you can search Photos, which pulls up a Google image search in the same panel.

Define
This tool functions very similarly to Explore. To access it, highlight some text and pull up the Context menu by right-clicking or holding Control on your keyboard while you click the highlighted text. Find the option to Define '[highlighted text]' and click it. A panel will open to the right of your document with a dictionary entry for the term you searched. This can be useful if you are reading through a document provided by your teacher and you come across a word you aren't familiar with.
And that's that!
There are so many more features available to you in Google Docs. We encourage you to spend some time exploring the tool to familiarize yourself with it before you begin any large assignments. If you need any help with Google Docs, feel free to reach out to technical support.
Comments
0 comments
Article is closed for comments.